Welcome to the FirebirdV6.com/CamaroV6.com forums.
You are currently viewing our boards as a guest which gives you limited access to view most discussions and access our other features. By joining our free community you will have access to post topics, communicate privately with other members (PM), respond to polls, upload content and access many other special features. Registration is fast, simple and absolutely free so please, join our community today!
If you have any problems with the registration process or your account login, please contact contact us.
If this is your first visit, be sure to
check out the FAQ by clicking the
link above. You may have to register
before you can post: click the register link above to proceed. To start viewing messages,
select the forum that you want to visit from the selection below.
well did some sanding on the bumper but had to stop since the sun started to go down and we could not see if there was still some clear on the parts that me and a friend sanded down. after this i will need to save up to buy some bondo to fill in the small nicks , the paint , primer, and the clear coat. :)
so today i and my friend finaly finished sanding the bumper down
toughest part . had to use 40 grit to get the edges down the make it smooth with 320
[IMG][/IMG]
bottom view
[IMG][/IMG]
top view
[IMG][/IMG]
left side
[IMG][/IMG]
from here my frind will do the rest since he know how to paint and stuff.
anybody have any suggestions on what to do or what to improve once the bumper is off and everything will be exposed when i mount the new painted bumper??
08' L76 6.0L 4X4 Chevy EXT.Cab LTZ Vortec MAX with Snug top cover, Dynomax exhaust,Hptuners& K&N intake
96' Camaro M5 to A4 conversion, alot of mods . GT35R Turbo full suspension. Built engine
The paint code should be on a sticker in the glove box. You'll want to use adhesion promoter before spraying the sealer. You'll also need to add flex agent/additive as per the paint system you use.
make sure you pull that side marker off before paint....lol
yea i know lol they have that star patern screw so i need that tip so i can take it off i keep forgetting to take my tools to my friends house and take it off
The paint code should be on a sticker in the glove box. You'll want to use adhesion promoter before spraying the sealer. You'll also need to add flex agent/additive as per the paint system you use.
i did not see anything in there when i tried looking for it
well guys today i decided to work on my bird and i uncovered some bad things in my opinion you will see in the picture below but anyways heres what i did today.
this is before i started to work on her
[IMG][/IMG]
the front bumper before removal
[IMG][/IMG]
now no bumper. it was being held on by 2 screws and 4 nuts that bolt on to the fenders. and all the plastic under the car which in my case was only about 4 small bolts. and 3 plastic rivets at the top in the middle fiber glass brace
[IMG][/IMG]
then i decided to take off the left fender since i noticed some rust. to me this was weird then i uncovered this
to me this picture above looks to be a patch and this now shows me why the whole left side of my car was all unaligned. when i was sold my car they told me it was never wrecked but found some proof it was , this was the bad part of my day working on her. but hey in the end im still proud of her for not leaving me on the side of the road so this is just 1 more thing i know about my car.
here is a different angle and some of the right side with no fender
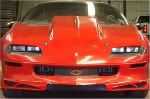
and one final picture as i finally was about to drive off
[IMG][/IMG]
sorry about it being diagonal
but
30 minutes later while i was driving home after i had bought some new plastic rivets and screws of the head lights i got a comment from some one at the auto parts store . they told me ''nice car kid, its nice to see a kid like you keeping that car on the road and keeping her looking nice. its looks mad with that bumper even tho its white'' i told em thanks and when i saw him drive away he was driving a gold and black trans am looked to be an 1980. it was a beuty after that i felt proud :cool:
Still trying to find oil leak on my Camaro, it’s a tough one. I think it is the oil pressure sender myself. Leaking when raving and going into boost....
3 days ago
FORUM SPONSORS
Collapse
Working...
X
We process personal data about users of our site, through the use of cookies and other technologies, to deliver our services, personalize advertising, and to analyze site activity. We may share certain information about our users with our advertising and analytics partners. For additional details, refer to our Privacy Policy.
By clicking "I AGREE" below, you agree to our Privacy Policy and our personal data processing and cookie practices as described therein. You also acknowledge that this forum may be hosted outside your country and you consent to the collection, storage, and processing of your data in the country where this forum is hosted.
 Tweet
Tweet


Comment