Keyed? Here's how you fix it - FirebirdV6.com/CamaroV6.com Message Board

Announcement

Collapse
No announcement yet.

Keyed? Here's how you fix it

Collapse
X
 
  • Filter
  • Time
  • Show
Clear All
new posts

  • Keyed? Here's how you fix it

    Figured I'd do a writeup on this since I'm pretty pumped about the results. This is a compilation of ideas/info I took from a bunch of people on different forums and it seemed to work out pretty good.

    I'll start off with saying I have zero body experience. I own a random orbital buffer and I use it in conjunction with clay baring, polishing, and waxing my car every year. (likely what most of you do), so if I can do this, you can do it.

    so lets start with the beginning. For those of you who don't remember, my car got keyed front to back...here are the pictures to refresh you're memory.
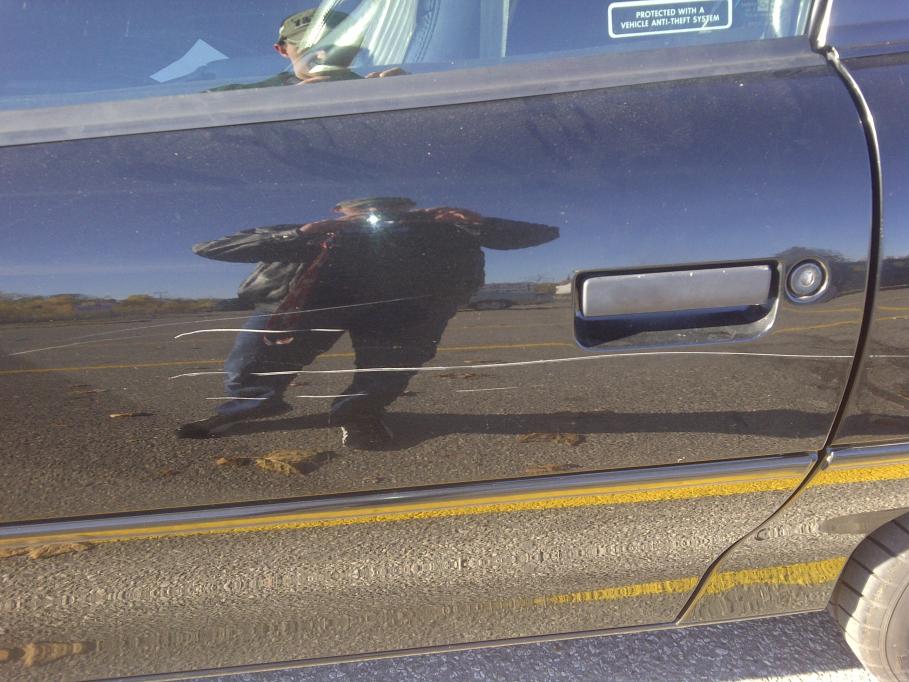
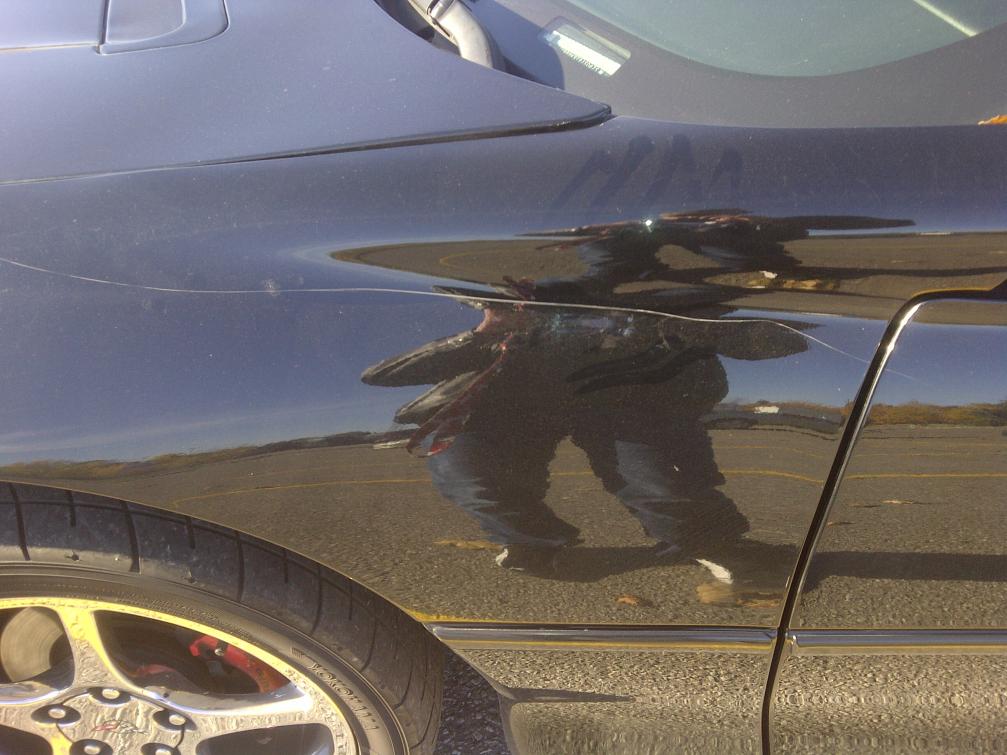
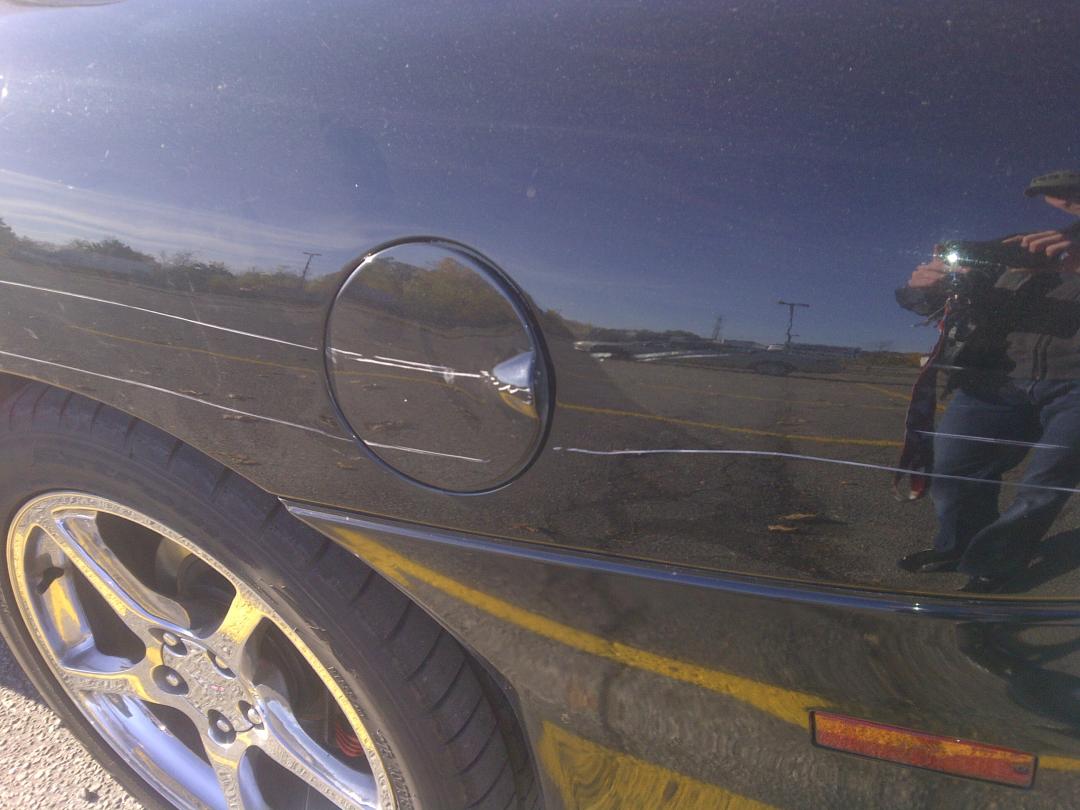


    Now, these were DEEEEP, you could feel it with your fingers, never mind your fingernail. So lets get into it.

    What do you need?

    Painters tape
    a very fine paint brush (something for like model cars or something of that sort)
    Touch up paint
    Clear Coat
    Rubbing Compound
    Cheese Cloth
    Polishing compound
    "Quixx scratch repair kit"
    Cold Beer

    Step 1

    Wash your car, give it a good wash to make sure all the dirt and grime is out of the area. Make sure you dry the car really well to.

    Step 2

    Get your painters tape...now this part is the most tedious, and extremely crucial. Tape the scratch very carefully so that only the scratch is exposed. Small pieces of tape work well for this as you are going to have to follow the contour of the scratch to a "T" with only the white part exposed. If some of your key marks split into two scratches, you are going to have to do this repair in two steps, you'll get that second scratch in a weeks time. DO NOT just glob your paint across because you are lazy and want to cover both scratches because they are extremely close to one another...it will look like sh*t, take your time and do it right.

    Tape around the area now, so you don't get over spray on the rest of your "good" paint
    Attached Files
    Last edited by LETZRIDE; 04-19-2012, 11:35 PM.

    2002 SOM Z28 Camaro - 12.9 @ 104 mph
    1996 3800 Camaro - 13.43 @ 100.77 mph


    Project Cars | How To Guides | Scratch Repair | Synthetic Oil

  • #2
    Re: Keyed? Here's how you fix it

    Step 3

    Once you are all taped up (took me a few hours to do 3 big sections on my car, remember you have to tape top and bottom of the scratch) you are ready to paint. Get your touch up paint which matches your car (make sure it matches your car, try it on something somewhere) and paint it onto to scratch. You are going to paint 3 coats, so do your first light, brush back and forth across the scratch as you make your way from one end to the other.

    Wait about 10 minutes inbetween coats (remember that cold beer?:poke:), and apply 3 coats total with each coat getting a little bit thicker *dont go overboard

    should look something like this.


    Note that the black painted lines are obviously way thicker than the exposed scratch area...this is how you are making sure you only paint the scratch.

    Step 4

    Spray 3 light coats of clear coat across the scratches. Again, wait about 10 minutes (2.5-3 songs on the radio) inbetween each coat.

    Step 5

    When you are done spraying your last coat of clear, wait about 1-2 minutes and start getting rid of all your tape/newspapers...do this carefully...pull the edges up nice and slow, you don't want to disturb anything, but you don't want everything you just did to dry to your tape either.

    Step 6

    Don't start feeling what you did...leave it alone. Don't rewash the car for 1 week. You can touch your work if you want later in a few hours.

    At this point or the next day you're likely looking at it going...What the f*ck...looks a little better, but looks butch, don't worry. Wait 1 week...7 days...before you go ahead and do any other steps.

    2002 SOM Z28 Camaro - 12.9 @ 104 mph
    1996 3800 Camaro - 13.43 @ 100.77 mph


    Project Cars | How To Guides | Scratch Repair | Synthetic Oil

    Comment


    • #3
      Re: Keyed? Here's how you fix it

      Ok, fast forward 7 days. Onto the next step.

      Step 7

      By now you're wondering why you're scratch is raised up so much, and what the heck is all that white crap around it. Don't worry...

      Apply rubbing compound to a cloth and begin rubbing it into the scratch...don't apply much pressure, let the cloth do the work. Rub it in for about 1-2 minutes, wipe it off, do it again.

      Step 8

      Get a wet cloth and remove all residue of the rubbing compound...especially run along the scratch a few times as the compound likes to get caught on the newly painted raised finish.

      Step 9

      Apply Polishing compound to a cloth or you're random orbital buffer, again don't apply much pressure, just rub it in for about 1-2 minutes and remove the residue. Do this twice. Again at the end of it take a wet cloth and remove all residue.

      *Note* At this point if you feel the scratch it is still raised...a little smoother but still raised...this is OK, you are about to address that now.

      Step 10

      Quixx repair kit comes with two tubes of paste labelled #1 repair, #2 finish, it also comes with two clothes (one for each tube, don't mix the cloths up) as well as some wet sandpaper (I think 3000 grit? I have to double check)

      EXTREMELY IMPORTANT...FOLLOW DIRECTIONS HERE BIG TIME

      Wet the sand paper, apply just enough pressure to evenly hold the sand paper to the body of the car. I sanded in a circular motion, DO NOT exceed 15 seconds of sanding or you risk taking off your clear coat. I sanded for roughly 8-10 seconds and slowly moved down the line smoothly.

      DO NOT DO THIS PART IF YOU HAVE TO PAINT ANOTHER SCRATCH THAT IS RIGHT BESIDE THIS ONE...YOU CAN ONLY, I REPEAT, ONLY SAND AN AREA ONCE Come back to this step and continue from here only after you are done repairing everything in the vicinity that your sandpaper will touch.

      Again, wet another cloth and remove all residue.

      Step 11

      Apply Quixx repair kit #1 tube, rub it in with LOTS of pressure for about 2 minutes. (lots of elbow grease here)

      Repeat this step a second time if need be, the scratch should be pretty much gone from most angles unless you are dead up close to it looking dead on.

      Get that wet cloth and remove all residue

      Step 12

      Apply Quixx repair kit #2, when you rub this stuff in, it disappears, so just rub it into the scratch until the white stuff is gone.

      Final Product. This is how mine came out.

      Front of car:


      Rear Panel:


      Attached Files
      Last edited by LETZRIDE; 04-19-2012, 11:37 PM.

      2002 SOM Z28 Camaro - 12.9 @ 104 mph
      1996 3800 Camaro - 13.43 @ 100.77 mph


      Project Cars | How To Guides | Scratch Repair | Synthetic Oil

      Comment


      • #4
        Re: Keyed? Here's how you fix it

        I haven't waxed or polished this yet...I'll probably end up hitting it with a swirl remover, double Polish and a wax.

        I still have to repair the door, and there is several areas that are two streaks from the way the key was angled...gunna take a few weeks of repairing it.

        I forgot to mention...if you need to paint a week later right beside a piece you already painted...don't sand that scratch down until you are done everything in that area...remember you can only sand ONCE, and for a max of 15 seconds.
        Last edited by LETZRIDE; 04-19-2012, 11:33 PM.

        2002 SOM Z28 Camaro - 12.9 @ 104 mph
        1996 3800 Camaro - 13.43 @ 100.77 mph


        Project Cars | How To Guides | Scratch Repair | Synthetic Oil

        Comment


        • #5
          Re: Keyed? Here's how you fix it

          Wow, I'm impress. Very nice write up.

          Good job.

          Comment


          • #6
            Re: Keyed? Here's how you fix it

            This is definitely something to keep handy! Looks like you achieved some amazing results too. Hopefully none of us will ever have to use your write-up, but juuuuusssttt in case, I'm gonna save it...lol
            aka FreedStyle
            Chaddrich Freed

            (1 of 443) 2002 SLP Firebird GT #107 (244rwhp/254rwtq naturally aspirated)
            2008 Silverado Crew Cab 5.3L 4x4

            Comment


            • #7
              Re: Keyed? Here's how you fix it

              Holy bawwwls

              Comment


              • #8
                Re: Keyed? Here's how you fix it

                Well done. Too bad you had to do it in the first place, but good write up. Should be stickied!
                In America's Hat!

                1997 Camaro 30th 'vert... GT1 cam/C6 wheels/Flowmaster/HIDs/Viper 2 way alarm/Alpine audio mods up the wazoo
                2005 Equinox LT... mostly stock daily/Thule snowsports roof system/sound + interior mods

                Comment


                • #9
                  Re: Keyed? Here's how you fix it

                  sticky? lol looks good nice work!

                  Comment


                  • #10
                    Re: Keyed? Here's how you fix it

                    nice work! sticky this!

                    Comment


                    • #11
                      Re: Keyed? Here's how you fix it

                      Great job.
                      08' L76 6.0L 4X4 Chevy EXT.Cab LTZ Vortec MAX with Snug top cover, Dynomax exhaust,Hptuners& K&N intake
                      96' Camaro M5 to A4 conversion, alot of mods . GT35R Turbo full suspension. Built engine

                      Comment


                      • #12
                        Re: Keyed? Here's how you fix it

                        Dang, dude thats F'in impressive!
                        Daily: '02 Black Yukon Denali
                        Toy: '06 Torrid Red GTO
                        Gone: Powerdyned '02 Pewter Camaro
                        Gone: '07 Charcoal Yamaha R6
                        Gone: Ex-wife, lol

                        Comment


                        • #13
                          Re: Keyed? Here's how you fix it

                          Nice job Mike and great write up too:)

                          Comment


                          • #14
                            Re: Keyed? Here's how you fix it

                            Thanks guys, theyre not totally gone, you can still see the marks if you put your face right up to it, but 95% of the time I would say when you look at the spots I touched up you can't see it.

                            If you look closely at the rear quarter panel picture you can see one of the scratches vaguely just below my right knee (your left), so it's not perfect, but I'd say its atleast liveable, and a heck of alot better than before!!

                            2002 SOM Z28 Camaro - 12.9 @ 104 mph
                            1996 3800 Camaro - 13.43 @ 100.77 mph


                            Project Cars | How To Guides | Scratch Repair | Synthetic Oil

                            Comment


                            • #15
                              Re: Keyed? Here's how you fix it

                              Originally posted by LETZRIDE View Post
                              Thanks guys, theyre not totally gone, you can still see the marks if you put your face right up to it, but 95% of the time I would say when you look at the spots I touched up you can't see it.

                              If you look closely at the rear quarter panel picture you can see one of the scratches vaguely just below my right knee (your left), so it's not perfect, but I'd say its atleast liveable, and a heck of alot better than before!!
                              The thing is you know exactly where they are.

                              Someone else would really have to look to see or notice them.

                              Comment

                              Latest Topics

                              Collapse

                              FORUM SPONSORS

                              Collapse
                              Working...
                              X