Just installed clear corners... my experiences - FirebirdV6.com/CamaroV6.com Message Board

Announcement

Collapse
No announcement yet.

Just installed clear corners... my experiences

Collapse
X
 
  • Filter
  • Time
  • Show
Clear All
new posts

  • Just installed clear corners... my experiences

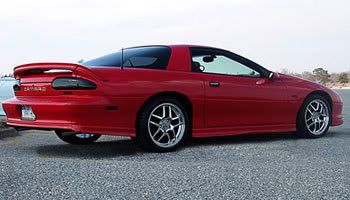
    As a first self-performed mod to my camaro, I chose to install a set of clear corners. They cost me $32.26 shipped on ebay. They came with amber bulbs, no instructions.

    So I get outside at about 5:30 PM, bright outside, and I get to inspecting my car. I've never read anything about them other than they look nice. I haven't read any instructions or the like, so after spending 10 minutes contemplating what I need to do to get behind the stock lights, I dive under my car. I removed the some odd 10 bolts (not sure on the size) from the driver's side, and get behind the light. I removed the three 7mm bolts and popped out the light. This took me about an hour, heh. I got the new one installed in about 10 minutes, and moved to the other side, which took me about 15 minutes. Just as it was getting dark, I got the passenger side in, but didn't have enough time or light to bolt up the number of bolts under the car. I can do that tomorrow before school.

    For a newbie, I'd rate the installation a 7/10 (10 being most difficult.) It was my first appearance mod, and was well worth the money and time, and countless cuts and knicks all over my hands and arms.

  • #2
    Nice little review, i personally did mine from the top so i dont know what its like from the bottom. Although if i remember back i do recall reaching up through the hole on my passenger side to help with something. (Theres a hole in the plastic stuff because pot holes are bad!)
    1999 Black V6 Camaro<br />Website: <a href=\"http://midnight-maro.freestarthost.com\" target=\"_blank\">http://midnight-maro.freestarthost.com</a> <br /><br />CAI,Lid,K&N,SLP LM, Powerdyne, Shift Kit, 160* thermo, and gauge pillar w/gauges.. Sittin in the garage: RKSport Headers, Carsound Cat, LSD, Fuel Pump, GTP Injectors, 3.73\'s

    Comment


    • #3
      From the top, this takes like 5 minutes a side with a 1/4 drive ratchet, and socket.

      DO make sure to post if they don't get water inside them. Because if they don't, then I'm sure people want to know who (seller on E-bay) you bought them from.
      <b>99 Pewter Metallic Camaro</b><br />SLP Ultra-Z Hood, Shaved Antenna, !mouldings, Chrome Halos, Filled Factory Grill, Y2K 18 R 19 F, SLP Whisper Lid, (functional w/ Hood), FlowMaster American Thunder C.B, QA1 Coilovers, Kuhmo Tires.

      Comment


      • #4
        what year is your car?

        96 V6 A4 Camaro and 99 Z28 A4 Camaro
        Visit My F-Body Page

        Comment


        • #5
          It's a 97, and black. They look pretty awesome, in my opinion. Not "ricey" as some people claim. I checked out from the top, but I really didn't feel like removing the whole headlight assembly, so I figured the bottom would be the easiest way.

          Comment


          • #6
            i dont believe 97 can be done from the top. did you get any pics ?
            1997 Camaro LS1 RS
            1994 Camaro - Sold
            1999 Trans am Vert - Sold

            A Few Mods....

            Comment


            • #7
              I suggest you take some cilicone glue and tape to the edges of your clear corners otherwise it's POSSIBLE you'll blow a bulb every rain... Mine did it and it got VERY annoying...

              Originally posted by 99V6Camaro:
              Nice little review, i personally did mine from the top so i dont know what its like from the bottom. Although if i remember back i do recall reaching up through the hole on my passenger side to help with something. (Theres a hole in the plastic stuff because pot holes are bad!)
              If you have a 97 or below you have no other choice but to do it from the bottom, which is lame...
              1997 Camaro RS W/T-Tops<br />All Stock / 200 HP

              Comment


              • #8
                The air dam kicked my *** when i did this....
                1997 Camaro 3.8 Liter A4- Y87 package,RKsport ceramic coated headers, Flowmaster 80\'s 2.5\'\' catback, 3\'\' Magnaflow High Flow Cat, K&N FIPK intake, SS hood, 17x9.5 chrome Zr1 rims, more to come....

                Comment


                • #9
                  hehe...

                  I would rate it a 7 or 8 out of 10.

                  and I have installed my own diff, rear end swaps, t-top conversion pulled the whole upper intake fuel rail on a motor, torn down others, brake jobs, etc...

                  botls and everything easy to get to, just had problems "forcing it" into place.
                  -Eric<br /><a href=\"http://www.cardomain.com/id/mustangeater82\" target=\"_blank\">2000 NBM V6 Camaro 5-speed</a> T-top <i>converted</i><br /><b>14.467@95.45mph</b> <i>$0 in mods</i><br /><i>The member formerly known as MustangEater8251</i>

                  Comment


                  • #10
                    the clear corners are the cheapest ( and I mean cheap as in not-well-made) part for the car...I have a metallic pewter 99 RS camaro and i put new clear corners in it about 3 or 4 times...tried sealing them up too. I finally just drilled a hole in the inner corner UNDERNEATH the light itself, that way all the water just runs out...it worked for me.
                    #1:1999 pewter metallic y87 rs A4 camaro.check out the pics on the link below<br />#2:Bright red 1979 Pontiac Trans Am. Brand new 400 cubic inch Pontiac Motor. All work done by me, except the engine work.<br /> <a href=\"http://www.cardomain.com/ride/2216133\" target=\"_blank\">http://www.cardomain.com/ride/2216133</a>

                    Comment


                    • #11
                      Thank goodness I have a Firebird... LOL
                      <a href=\"http://www.cardomain.com/id/maleet\" target=\"_blank\">1998 Silver Firebird</a> <br />Basic mods... nothing real special but it sure looks good!<br /><a href=\"http://www.maleetpobanz.com\" target=\"_blank\">maleetpobanz.com</a>

                      Comment

                      Latest Topics

                      Collapse

                      • FirebirdGT
                        New Site Hosting Issues
                        by FirebirdGT
                        All - sorry but there seems to be some glitches from moving to a new Host - hopefully they will be fixed soon.

                        If needed you can email me...
                        1 week ago
                      • LETZRIDE
                        New Owner!
                        by LETZRIDE
                        I am happy to announce that I have sold the site to Robert (FirebirdGT). Years ago this site went down when TealV6 had it, I bought it, refreshed it,...
                        4 weeks ago
                      • LETZRIDE
                        Tom Henry RS Pt 4: Suspension Mods, Tires, Wheels, Headers and other Cool Stuff
                        by LETZRIDE


                        Building the Tom Henry RS
                        Part 4: Suspension Mods, Tires, Wheels, Headers and other Cool Stuff.
                        By: Hib Halverson


                        At the end of Part Three, we changed the valvetrain of the 3.8-liter V6 in the Tom Henry RS. We installed new, Yella Terra "Ultralite" 1.8:1, aluminum roller rocker arms, Katech valve springs and Katech titanium retainers on our 3800 Series II V6.
                        Ultralites are nearly 25% lighter than the stock 1.6 rockers and 8% lighter than the SLP aluminum...
                        02-07-2020, 11:30 PM

                      FORUM SPONSORS

                      Collapse
                      Working...
                      X