Repainting my POS/Progress thread - FirebirdV6.com/CamaroV6.com Message Board

Announcement

Collapse
No announcement yet.

Repainting my POS/Progress thread

Collapse
X
 
  • Filter
  • Time
  • Show
Clear All
new posts

  • Repainting my POS/Progress thread

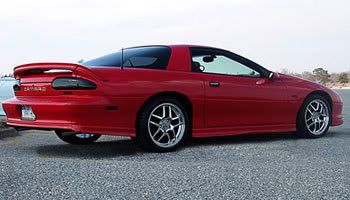
    Hey guys I'm Matt. I signed up on here a while back but never really posted much. I originally bought my car as a crappy weather/beater car so I could drive the 'Ray on nice days in the summer and the 'Maro during the winter. It was wrecked @ $4000, but the wreck wasn't major so I fixed it within a couple days. The inside was what I wanted, it was in perfect condition for a 75,xxx mile car.

    Well now that I've thought about it, I've decided to dump a load of cash at the Camaro. Not bragging or anything but I'm a pretty decent painter that dabbles a bit in electronics and suspension (susp has only been lifting trucks though). So I know my in's and out's for this job.

    To get to the paint, maroon is the gayest possible color that could come on this car. So I've mixed up my own custom black (that nobody will ever match if I wreck the car, including myself ;)) that I'm going to spray on ASAP.

    If anyone is interested, when I'm not out killing my shoulder wetsanding, I figured I would throw up pics and have a detailed writeup of how to do basic bodywork and paint your 'Maro if you think it looks as bad as mine. :banana:

    I look forward to the next week or so posting up this guide. I'll throw some pics up in a few hours, I'm running late for my only class today. :wavey:
  • #2
    Re: Repainting my POS/Progress thread

    curious to see how it comes out
    1997 Camaro LS1 RS
    1994 Camaro - Sold
    1999 Trans am Vert - Sold

    A Few Mods....

    Comment


    • #3
      Re: Repainting my POS/Progress thread

      Cant wait to see the pics

      Comment


      • #4
        Re: Repainting my POS/Progress thread

        Originally posted by Maro99
        Cant wait to see the pics
        I will be glued to this thread, brutha.

        Comment


        • #5
          Re: Repainting my POS/Progress thread

          Originally posted by Atreus21
          I will be glued to this thread, brutha.
          x2...

          a write up on painting and body work...
          this should be good.

          please hurry lol, and take alot of pics
          *Matt


          Old people shouldnt use the internet.

          Comment


          • #6
            Re: Repainting my POS/Progress thread

            First post in, I have to show the "very beginning" pics.

            I started with it in this shape:


            Even though it looks bad, it isn't. Cracked plastic, etc. The core support was still intact and one headlight bracket was bent. The pass side frame horn was bent down, not enough to make a big difference because it took a couple whacks to get it straight enough to work with. I had to build the bottom of the door from fiberglass and bondo, and weld a foot of rocker panel on. Nothing big. (btw, rocker info can be found here: http://forum.camarov6.com/showthread...422#post623422)

            Within the span of a couple days, we had this:


            I was in hustle mode at that time so I didn't take the time to snap pics of the progress work.

            However, I know this time around it's going to take a good week of work to finish it, so I'll use those breaks from destroying my shoulder to snap the pics. ;)

            I'm going to run and grab the camera now so I can upload today's set of pics and get the next post up here.

            Comment


            • #7
              Re: Repainting my POS/Progress thread

              Alright guys, my first actual post on the matter is three days into the ordeal.

              There were some bumps and bruises I wish I had taken pics of beforehand, but it's too late now so I can't do much.

              My tool list: (no certain order)

              -400 grit sandpaper (at least one full box)
              -one box of scotchbrite pads (a.k.a. scuff pads)
              -flowable polyester putty (a.k.a. finish mud, can be applied over primer rather than only to bare metal like bondo)
              -scraper/board (for mixing the poly)
              -squeegee (to remove excess water)
              -towels
              -any type of bottle that water can be squirted from (athletic water bottle, empty buffing compound bottle, etc)
              -granola bars
              -beer
              -foam sanding block
              -roll of straight 180 grit (not round)
              - " 80 grit

              Here we go: (btw, captions for each image are underneath)


              This is the beginning of day three. On this side, I had previously taken out the side marker (requires a small torrx bit) and gas cap shroud (requires a phillips driver). After a couple hours of wetsanding and scuffing, I was at a point where I wanted to be. About 2.5" above the gas door was a small dent that I scraped some poly over and then primed. Since I'm going with black as my final color anyway, I shot some in and around the side marker recess.


              The red circle denotes an area of cracked fiberglass where my girlfriend backed into a fence. Needless to say, she hasn't driven my car since then (and never will!) I fixed it with a small piece of 80 grit (to roughen the area up), poly, then finished it up with a piece of 180 grit on a foam sanding block. Primer on top, and we're done here. I also want to note that I had to remove the back panel for this process, so the lights and panel both came off. (requires fingers to twist off the taillight nuts and a 10mm rachet or wrench for the four panel nuts)


              This shows that I did the inside of the hatch, using mostly scuff pads because of the limited area. I took all rear panels and the hard-backed carpet out, to store in the garage. I then shot primer over the scuffed areas. (Never leave metal exposed!)

              (No pic) I had removed the spoiler and third brake light to scuff and wetsanded everything underneath and on the bottom of the spoiler. I also scuffed where the spoiler bolts to the hatch, and sprayed a bit of primer there. Primer has also been sprayed around the third brake light area. (spoiler removal required 10mm rachet for four nuts. Third brake light used the small torx bit once again.)


              This is where I started today. On the right side, you can see that it's very dull-looking. Going left, you can see that there starts to be patches of reflection, ending with it looking normal on the left. The right side is how your wetsanding should look - dull with NO patches of reflection. The reflection is where there is still clearcoat. In the middle of the picture, where there is an equal amount of reflection and dullness, is an example of GM's painting ability. That would be your orange peel.


              Well guys, I have to run and pick up my lady now, I have five more pics that I'll upload around 10PM CST tonight.
              I know so far it's been vague, that's because I had a couple days headstart and got most of the harder stuff out of the way! Everything from now on will be more detailed since I will be snapping pictures as I go along.

              (If anyone is interested, I can throw up the start to finish pictures of my Stingray as an example of much harder prep/paint than the Camaro!)

              Comment


              • #8
                Re: Repainting my POS/Progress thread

                Sorry guys I was getting that DNS error all night, I'll put up the next posts in a while.

                Comment


                • #9
                  Re: Repainting my POS/Progress thread

                  Looks good so far.
                  Just curious though, are you painting inside of the door jambs, hatch and engine bay? And what's your final sandpaper grit just before painting the primer?
                  sigpic

                  Comment


                  • #10
                    Re: Repainting my POS/Progress thread

                    good writeup so far
                    1997 Camaro LS1 RS
                    1994 Camaro - Sold
                    1999 Trans am Vert - Sold

                    A Few Mods....

                    Comment


                    • #11
                      Re: Repainting my POS/Progress thread

                      Originally posted by hockeyman
                      Looks good so far.
                      Just curious though, are you painting inside of the door jambs, hatch and engine bay? And what's your final sandpaper grit just before painting the primer?
                      I will be doing the door jambs and hatch in the same color as the rest of the body, along with the underside of the hood. However, since I've got the Vette in the shop to rebuild the tranny, I can't pull the motor for a proper engine bay shoot right now. Instead, I'm going to do everything else, and during my winter break I'll either pull the motor or work around it to get a good job done. For now, it'll still be wetsanded and hit with black primer so it doesn't stand out too bad. ;)

                      I started getting that DNS error all morning after I made that post earlier, so I'm going to put up the next part in about two minutes.

                      EDIT: The final grit sandpaper (for paint or primer) is always 400 grit. You can use other grits beforehand (say you're going over some poly you knocked down with 180 grit, you must go to 400 grit and remove all of the 180 grit scratches). I tend to remember it this way: 400 grit is your "main" grit. Anything below is used for "actual body work" (getting to bare metal for bondo with 80, working bondo/poly with 180, final work on poly/bondo with 220 or 320 [optional]). Anything above 400 is generally used for "final" work (600, 800, and 1000 for knocking down runs and orange peel quickly, 1500 for buffing, 2000 and higher for show car worthy buffing)
                      Last edited by lordmatt; 10-13-2006, 01:02 PM.

                      Comment


                      • #12
                        Re: Repainting my POS/Progress thread


                        Here's one step I always include, but it seems like few shops do. After I've wetsanded an area to my liking, I go back over it with a scotch pad, paying extra attention to the edges. I feel like it's hard to wetsanded near edges as effectively as large, flat surfaces, so I hit them twice as hard with the scotch pad as I do the bigger areas. You may choose to skip this step, but for me, I want the job done as thoroughly as possible - after all, it's MY car, MY paint, MY time, and MY money, so I want the best possible job I can get. I'm spending so much time on it anyway, why not toss in a couple extra hours to to ease my consience?


                        Another important step, especially when doing a complete color change like this, is to get around and underneath every possible thing you can. Some people just scuff up to the edge of antenna bases, door trim, etc, but I think they should be taken off and prepped as well. If you paint up to the edge, you're leaving yourself open for the paint to lift and flake off in that area. The antenna base is easy enough to remove, it required removing a single 10mm bolt directly underneath (behind the rear interior panel) and pulling down. This removes the "inner" part of the antenna (the mast holder/mast). After that it was a simple move of sticking a flat screwdriver underneath the rubber base and popping it off!


                        Be sure to wetsand and scuff thoroughly underneath the base.


                        After a mere hour and a half, the passenger quarter is finished to my liking. I didn't include the image of removing the door bump guards, because I'm going to use that in today's post where I prep the doors.

                        It was cold yesterday and it's cold today, so now I'm back to wetsanding in a sweatshirt and jeans, cold water running down my hand in 40 degree weather.

                        I already have a dozen pictures for the next installment later tonight. Paint chip work, bump guards, mirrors etc. It should help somebody out.

                        Comment


                        • #13
                          Re: Repainting my POS/Progress thread


                          Here's how I removed the bump guards. Since I'm going to reshoot the car anyway, I wasn't "gentle" with them. I stuck a screwever in there and levered enough room to get a good hold on it, and pulled. One thing I noticed, when I pulled softly, was that the double-side tape that holds the guards on was able to rip in half. I would then have to go back and scrape the rest off, which resulted in a bunch of unnecessary work. I realized when I pulled harder and faster, that the tape came completely off the door in one piece.


                          Here you can see the difference. On the left side, I was pulling slowly and with a constant force. I slid in some rock and ripped back a bit harder, and noticed the tape had come off the door as well. I slowed down once again, and the tape started ripping in half. So I got a good hold and ripped back much harder than before, and it all came off in one piece. (That's dialogue is assuming you're looking left to right along the door.)


                          Up on top, I had a small problem. Something had hit the car and ripped a bit of clearcoat off, and chipped all the way down past the primer. I couldn't just paint over it, or else there would be an ugly indention showing I hadn't done proper body work.


                          Some shops would just throw some poly over the spot and call it good. I call that a band-aid fix. The area needs to be properly cleared before putting any finish mud on top. I took my foam sanding block along with a piece of 180 grit sandpaper, and went at it. I made sure to use a large area so the poly will properly feather out and there won't be any raised edges once the paint goes on. Black is the most unforgiving color there is, so prep work is IMPORTANT here.

                          (cont later)

                          Comment


                          • #14
                            Re: Repainting my POS/Progress thread

                            Guys I'll get more stuff up at some point, right now I'm going to take advantage of the dozen cans of Red Bull in the garage and not stop until this thing is ready to paint. I expect to paint tomorrow. I'm out. ;)

                            Comment


                            • #15
                              Re: Repainting my POS/Progress thread

                              Looks like you're really doing a nice job there. Do you plan on taking off the windows/seals? I only mention it because I had my car painted another color and now the front windshield seal is shrinking a little and the old paint is visible along a few edges.


                              If I had to do it again I think I'd at least do a lot of the prep work myself and strip the car myself. The body shop I went to was nice enough but they just did a lot of things half a$$. Like my mirrors the inside of the mirror housing isn't painted the new color so when the mirror is tilted like it should be for driving you see the older color. And I don't think they sprayed my car in a booth I have a lot of sand specs painted on mainly on my roof.
                              1997 Camaro v6 3.8 <br />Bone Stock, just a little slower then most station wagons.<br />**Either the slowest SS or the prettiest v6**

                              Comment

                              Latest Topics

                              Collapse

                              There are no results that meet this criteria.

                              FORUM SPONSORS

                              Collapse
                              Working...
                              X