Lowering Springs Install!! Pics Inside!!! - FirebirdV6.com/CamaroV6.com Message Board

Announcement

Collapse
No announcement yet.

Lowering Springs Install!! Pics Inside!!!

Collapse
X
 
  • Filter
  • Time
  • Show
Clear All
new posts

  • #16
    Re: Lowering Springs Install!! Pics Inside!!!

    Originally posted by Black98Fivespeed
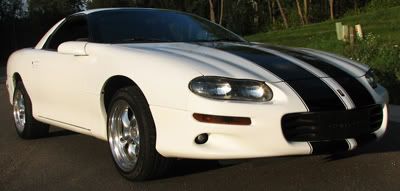
    What did you use to tint the turn signals? I'm planning on doing mine soon, I'll probably sand mine smooth and use tinting film.
    VHT Nightshade
    how much did thoes springs cost?

    -Y87
    Lid,K&N Filter,PaceSetter Headers,Magnaflow Cat 2.5in S-pipe,Flomaster :(,3.42 LSD

    Comment


    • #17
      Re: Lowering Springs Install!! Pics Inside!!!

      Originally posted by Black98Fivespeed
      What did you use to tint the turn signals? I'm planning on doing mine soon, I'll probably sand mine smooth and use tinting film.
      I simply used VHT Niteshades on my clear corners to black them out, didn't sand the lens themselves since they were very smooth to start with, I did however wet sand them between coats of clear to get a nice smooth finish. You can do some simply google searches on VHT Niteshades tutorials, there are a lot of them out there. Never really liked the look of tinting film, most of the time the edges don't turn out right, but to each his own.

      Comment


      • #18
        Re: Lowering Springs Install!! Pics Inside!!!

        Originally posted by Sean_99_3.8
        VHT Nightshade
        how much did thoes springs cost?
        paid $190 for everything in the first picture, and they are in fact Hotchkis springs

        Comment


        • #19
          Re: Lowering Springs Install!! Pics Inside!!!

          Originally posted by TheGr8Schlotzky
          Let me just say black halos+black car=teh sex.
          well thank you!

          Comment


          • #20
            Re: Lowering Springs Install!! Pics Inside!!!

            Originally posted by SpeedingFirebird
            Basically, that's it. I had to disconnect the bottom of the shock for the car to drop far enough to pull them out, but there is nothing but pressure holding the rears springs in.
            yeah I was wondering if I would need to take the bottom shock mounts loose to drop the axle down alittle more.

            Comment


            • #21
              Re: Lowering Springs Install!! Pics Inside!!!

              Originally posted by StiLlsMoKiN875
              yeah I was wondering if I would need to take the bottom shock mounts loose to drop the axle down alittle more.
              I had to when doing my axle swap. The good news is these bolts are easy to get to. You might want to PB Blast them the night before just in case.

              Did you have to replace the front end links on the install?
              Last edited by SpeedingFirebird; 01-08-2008, 10:22 PM.


              http://www.cardomain.com/memberpage/799659

              Comment


              • #22
                Re: Lowering Springs Install!! Pics Inside!!!

                Originally posted by SpeedingFirebird
                I had to when doing my axle swap. The good news is these bolts are easy to get to. You might want to PB Blast them the night before just in case.

                Did you have to replace the front end links on the install?
                no, but i probably should have.

                Comment


                • #23
                  Re: Lowering Springs Install!! Pics Inside!!!

                  Originally posted by StiLlsMoKiN875
                  no, but i probably should have.
                  What do you mean by this? Is this something I need to be concerned with should I attempt this myself?

                  Lounge Moderator

                  Comment


                  • #24
                    Re: Lowering Springs Install!! Pics Inside!!!

                    Originally posted by Bonemaro
                    What do you mean by this? Is this something I need to be concerned with should I attempt this myself?
                    the endlinks are what connects the sway bar to the front lower a-arms, the stock endlink bushings are made out of rubber and don't hold up as well as aftermarket poly bushings. The endlinks should not stop you from doing this install, even tho mine were pretty rusty and I had to use WD-40 to break them loose, they still are the least of your worries. I am going to be replacing the front sway bar in the next week or so, so I waited to change the endlinks out anyways since the new sway bar comes with new poly bushings. Provided a pic if your still lost about the endlinks.

                    Comment


                    • #25
                      Re: Lowering Springs Install!! Pics Inside!!!

                      Originally posted by StiLlsMoKiN875
                      yeah I was wondering if I would need to take the bottom shock mounts loose to drop the axle down alittle more.
                      yup, would be easier than lifting your carpet and taking off the top nuts.:)

                      As far is endlinks go, I broke 3 out of 4 bolts doing my shocks/springs. Replacements are very cheap at any auto parts store.

                      Comment


                      • #26
                        Re: Lowering Springs Install!! Pics Inside!!!

                        Originally posted by IDoVoodoo
                        yup, would be easier than lifting your carpet and taking off the top nuts.:)

                        As far is endlinks go, I broke 3 out of 4 bolts doing my shocks/springs. Replacements are very cheap at any auto parts store.
                        yeah I come really close to breaking one of the two bolts on mine, glad I used WD-40 to loosen them up before I started wrenching on them.

                        Comment


                        • #27
                          Re: Lowering Springs Install!! Pics Inside!!!

                          Originally posted by StiLlsMoKiN875
                          the endlinks are what connects the sway bar to the front lower a-arms, the stock endlink bushings are made out of rubber and don't hold up as well as aftermarket poly bushings. The endlinks should not stop you from doing this install, even tho mine were pretty rusty and I had to use WD-40 to break them loose, they still are the least of your worries. I am going to be replacing the front sway bar in the next week or so, so I waited to change the endlinks out anyways since the new sway bar comes with new poly bushings. Provided a pic if your still lost about the endlinks.
                          Cool... yeah, I was just wondering if that was something that got damaged easily during the install. This is a cool thread. I'm feeling more confident about doing this myself now.

                          Lounge Moderator

                          Comment


                          • #28
                            Re: Lowering Springs Install!! Pics Inside!!!

                            Originally posted by Bonemaro
                            Cool... yeah, I was just wondering if that was something that got damaged easily during the install. This is a cool thread. I'm feeling more confident about doing this myself now.
                            well I'm glad I could help, you shouldn't have any problems doing this in your driveway as long as you have the right tools for the job, and enough patience lol

                            Comment


                            • #29
                              Re: Lowering Springs Install!! Pics Inside!!!

                              Originally posted by StiLlsMoKiN875
                              well I'm glad I could help, you shouldn't have any problems doing this in your driveway as long as you have the right tools for the job, and enough patience lol
                              Tools, yes. Patience is debatable.

                              Lounge Moderator

                              Comment


                              • #30
                                Re: Lowering Springs Install!! Pics Inside!!!

                                Originally posted by Bonemaro
                                Tools, yes. Patience is debatable.
                                haha yeah I had a few moments during this install where I wanted to throw some tools, but it all came together in the end.

                                Comment

                                Latest Topics

                                Collapse

                                FORUM SPONSORS

                                Collapse
                                Working...
                                X